If you’re driving down from San Francisco to Los Angeles, you have to make a choice.
Take the scenic (but somewhat more dangerous) Highway 1, or stick to Hwy 101 and get there quicker.
The choice may seem obvious, yet countless travelers still choose to go with the longer and more treacherous route. This is the power of visual stimulation.
We are compelled by the emotions and experiences created by what we see.
Similarly, when people browse the web, they are drawn to images.
Even in the 90s, when images took forever to load, people loved them. With the speed of the web today, they have basically become mandatory.
As you add images to your pages, you need to consider how they impact user experience, of course, as well as how search engine crawlers will interpret them. It’s only when you optimize for both does your SEO shine.
Let’s explore how to optimize your images for both of these factors.
How To Optimize Images For User Experience
There’s no doubting that people love images.
But how much of a difference do images really make? If you simply created an all-text page, would people really notice the difference or, more importantly, care?
The answer is a resounding, “Yes!”
Pages featuring at least one image rank better than their non-image counterparts.
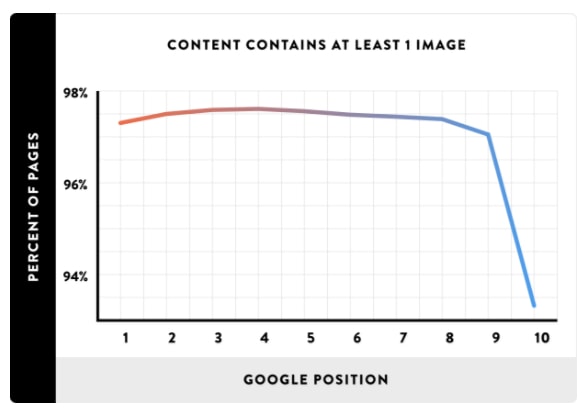
Remember that search engines reward sites that improve user experience (UX). If your image does the opposite, you’re actually hurting your SEO.
Here’s what you should watch out for:
1. Select Photos That Fit
Adding an image to a page just to have one is a bad idea.
The image you choose needs to be relevant to your page. Otherwise, you just end up sending a mixed message to your readers.
For example, this blog post by Jane Friedman features an image that’s just out of place.
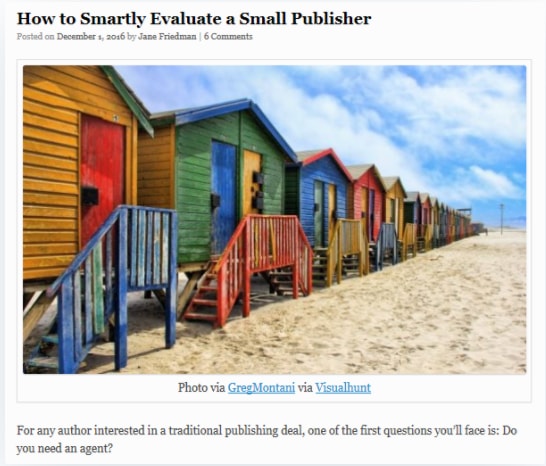
Out-of-context images drive up your bounce rate which negatively impacts your SEO.
Where do you find professional-looking images relevant to your content?
Unless you have the resources to get high-quality images made, you’ll have to source them from somewhere else.
Here are a few places you can look:
These are image databases that have a wide selection of high-quality photos to choose from. You can even filter by license to make it easy to find images you can use legally.
These are tools let you create graphics and images with ease.
Regardless of which path you take, just avoid using obvious stock photos. It’s better to not include an image at all than use a cheesy stock photo on your site.
Here’s an example of an image that wouldn’t add any value to your site:

2. Reduce File Sile
Due to our society’s growing impatience and shrinking attention span, any site that takes longer than 2 seconds to load is at risk for being demoted in rankings.
Take a look at average load speed of the top ranked pages:
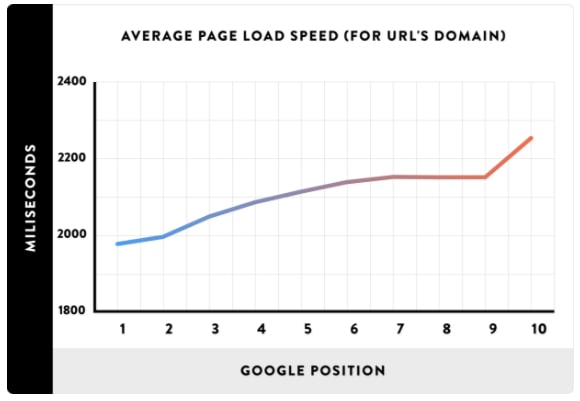
Unfortunately, if you’re not careful image files can substantially slow your page load speed.
Your job is to reduce the size of your images without compromising their quality.
Here’s how:
Compress your images before uploading them. There are a bunch of tools online like Image Compressor and CompressJPEG that will compress images without compromising on quality.
If you’re using WordPress, you can compress your images even further.
Plugins like Kraken Image Optimizer and WP Smush will let you shave off an additional few KBs from your image before it’s finally online.

3. Include Social Sharing Options
People have a natural love of sharing.
It’s a habit that has been hardwired into each one of us since birth. A study by the New York Times uncovered the reasons why we share.
They summarized their findings into 5 simple points:
- To bring value to others
- To define ourselves to others
- To nourish existing relationships
- For self-fulfillment (to feel more involved in the world)
- To get word out about causes or issues they support
On the web, social media has evolved into the ideal medium for sharing.
This is where most people from an individual’s network are likely to hang out. Sharing content here maximizes their reach.
Just look at the number of retweets on Twitter or repins on Pinterest to get a sense of the scale of sharing on social media.
The bulk of shared content on social networks is images.
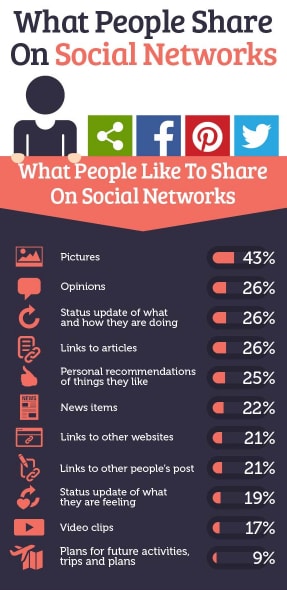
This is why you should include social sharing options directly on your images, especially if they are social media friendly like infographics.
Designboom places social sharing buttons conspicuously, making it nearly impossible to miss this option.
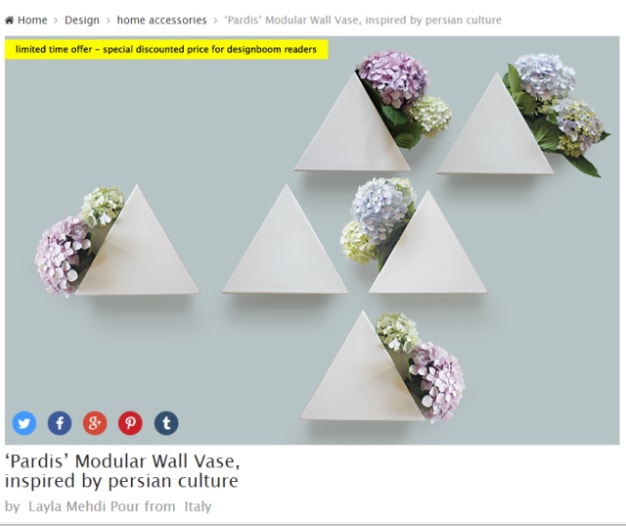
By encouraging users to spread your image, you’ll attract more traffic which leads to opportunities for natural links that boost your SEO.
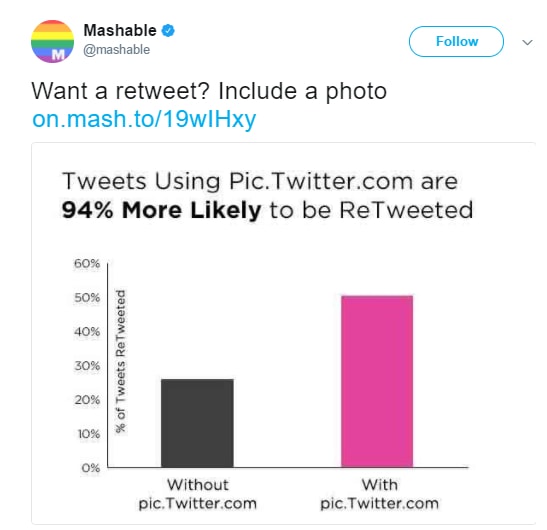
An image will also increase the likelihood that your post will get wider distribution. In fact, tweets using pic.twitter.com are 94% more likely to get re-tweeted.
4. Host Images on your own servers
Image sharing communities such as Imgur and Postimage have become notably popular.
On any given day, 1.5 million images are added to these growing image hosting sites and, in the process, they redirect traffic from heavyweights such as Facebook and Reddit.
As a result, hosting your images here has become a tempting option.
Users already trust the platform and this makes it enticing to conserve your own storage space so that you can opt for lower-priced site hosting plans.
However, this is a risky game. It puts your images at the mercy of others.
If Imgur or Postimage servers become overloaded, images may take a long time to download, resulting in slow page load times.
Worse yet, your image may be deleted without warning.
Your page may end up looking like this:

If you had link juice (backlinks) associated with that image you can kiss it goodbye.
At best, you can try to salvage the broken page with 301 redirects.
For this reason, if you’re serious about ranking, you should use your own servers to host images. The investment will be worthwhile in the long run.
How to Optimize Images For Search Crawling
Search engines spiders can only read the text on a page.
However, this doesn’t mean your images are invisible to them. It just means that spiders look for text-based descriptions to make sense of your images.
This helps search engines like Google to better understand your page.
It also allows your images to show up on searches made using the Google Images tab.
1. Include Keywords in Image Names
The name you give your image helps crawlers understand what they’re looking at.
Google’s image publishing guideline clearly suggests that you need to be as descriptive as possible when naming your images.
Here’s a naming convention you can follow:
- Include at least one keyword
- Don’t bother with small words such as ‘a’ or ‘the.’
- Add dashes instead of underscores between words
Why dashes over underscores?
For whatever reason, dashes are favored. Matt Cutts offers some details in his blog, explaining:
If you have a url like word1_word2, Google will only return that page if the user searches for word1_word2 (which almost never happens). If you have a url like word1-word2, that page can be returned for the searches word1, word2, and even “word1 word2”.
Clarity is better than ambiguity.
For example, an image of a sleeping puppy named “labrador-sleeping-puppy” is better than the generic “img002299” which gives little away in terms of image content.

2. Pay Close Attention To Your Alt Text
A file name isn’t the only way to help search engine crawlers determine image context.
Spiders also look at alt text and use it to determine which images are suitable to be shown during image search queries.
Let’s say you have an image of a 2012 Ford Mustang saved and tagged appropriately.
This might be your alt text for that image:

To come up with ideal alt text, think more in terms of what phrase a searcher might actually use in the input field.
Let’s use the same labrador puppy example from above.
The key here is to use your keyword and be descriptive. Here are a few ideas.
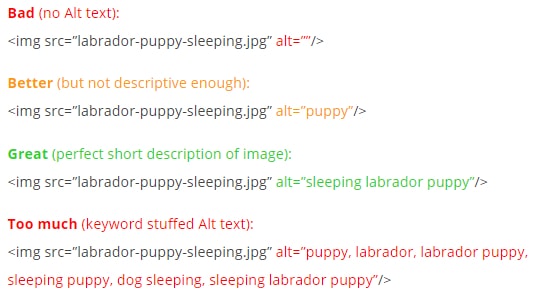
Notice how the best description is short but informative.
Like with your content, avoid keyword stuffing. This just makes your image look like spam.
Your alt text is also useful in situations when your image doesn’t appear on a page. This could be a result of the user being on a slow connection.
For such individuals, in place of the image, they’ll see your alt text.

Also, consider filling out the title tag of your image.
While it won’t have a direct impact on your SEO, title tags improve user experience by letting them hover over an image on their browser to get more information about it.
3. Add Captions To Images
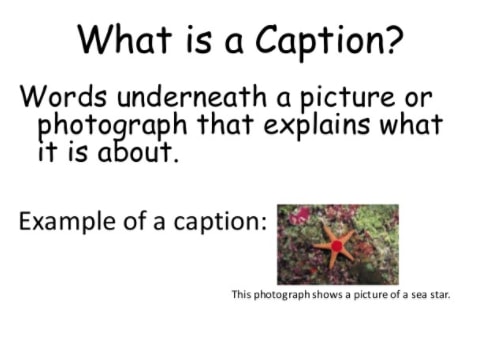
A caption is a short bit of text often found right below an image.
Since people tend to scan a page rather than read it, captions help readers ‘scan’ images quickly without having to stop and make sense of what they are looking at.
On average, captions are 300% more likely to be read than the copy of your main body. Not using them is a missed opportunity to engage a large number of readers.
In other words, captions help convince visitors to stay on your page.
This leads to an SEO boost because Google factors in time spent on page and bounce rate into its ranking algorithm,
Be careful not to get carried away though.
Only add captions if they help convince visitors to stick around longer and understand the value of your post. Otherwise, a caption for every image will look odd.
Page visitors read captions to get a quick overview of the points you find important enough to warrant an image. If there are too many words or a deluge of images, you’ll lose the benefit of summary caption text.
4. Create Image Sitemaps
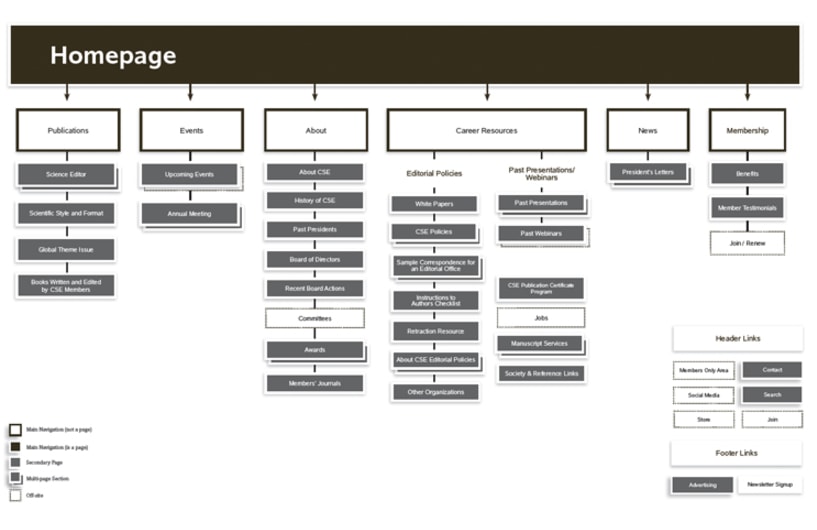
A sitemap is a file in which you list all the pages that make up your website.
This is a great way to give Google a helping hand to thoroughly understand your page in case it missed something during its initial crawl.
It also helps you organize your site and make it more user-friendly.
Here’s how your sitemap might look:
You don’t have to limit yourself to sitemaps that explain the structure of your site.
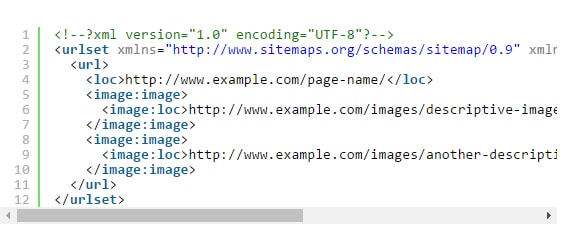
You can create a separate XML sitemap just for your images.
This lets you add metadata information about your images such as subject matter, image type, geographic location, and its licensing rights.
As far as SEO goes, image sitemaps give you an opportunity to ‘talk’ to search engines and tell them exactly what you want to be indexed.
This increases the likelihood of your images being found, particularly those that otherwise may have been buried such as those loaded by JavaScript code.
Take a look at this sample XML sitemap:
Creating a sitemap isn’t hard.
If you can’t code, there are a number of tools in the market today that are straightforward to use and can get the job done, such as Free Sitemap Generator.
If your site is built on a CMS like WordPress, plugins like Yoast SEO will automatically add your image data into an XML sitemap.
Conclusion
Images are often viewed as decorative ornaments. Most people add them in to break down large chunks of text to improve readability, give readers a mental break and leave it at that.
But with 78% of all SEO issues stemming from images, overlooking image SEO is a mistake.
Every image you add should have a definitive purpose and improve the user experience.
Once you achieve that, take some time out to help search engines understand exactly what they’re looking at.
Only by optimizing for both the user and search engine crawlers will you gain the maximum SEO boost from your images.
